Time for another BLOG HOP and Inspirational Challenge from Scrapbook Boutique .
The Hop starts and ends at the Scrapbook Boutique Blog. If you're following along you should have arrived from Narelle's blog and when you leave me you hop over to Therese's Blog.
The hop is open for one week, closing at midday Tuesday 17th February.
Unfortunately the blog hop prize (and the inspiration challenge) are only open to anyone with an Australian mailing address.
Join the Blog Hop and you could be the lucky person to receive
a $10 gift voucher to spend in the store.
a $10 gift voucher to spend in the store.
~~~~~~~~~~~~
Join us if you can for our regular monthly inspirational challenge.
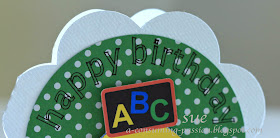
I thought it might be fun to recreate the inspiration photo using the Silhouette Cameo.
My challenge was to create a scalloped card from scratch. I tried drawing a large circle followed by smaller circles around the the edge but there was a much easier way......Thank you Google :)
- Follow this tutorial to draw the scalloped circle.
- Enlarge to measure 5 inches then mirror it above.
- Overlap the scallops where the two images meet and weld.
- Draw a dashed fold line at this point. (to stand the card on the bottom two scallops, the fold will be at approx. 10 o'clock.)
- Send to Silhouette and cut from white card.
- With the scalloped card still on the desktop, draw a circle and size to fit within the scallops. For now click on 'no cut' in the cutting window.
- Move base card off the desktop. Chose a font and type happy birthday. Double click on the sentiment and drag it to fit within the top of the circle.
- Exchange the cutting blade for a black sketch pen. Send the file to the silhouette and watch in wonder as it writes your sentiment over your chosen DP. Don't remove the cutting mat between writing and cutting.
- Replace the sketch pen for the cutting blade and in the cutting window click on 'cut edge'.
- Adhere the sentiment DP to the front of the scalloped card.

- The cupcake was designed in three parts, filled with colour and welded together. The fonts were added to the cream topping and slate, then filled with colour.
- This image was being printed to white card first, so I added the registration marks.
- In the software I selected cut edge in the cutting panel. Added the printed image to my cutting board and cut the cupcake out.
- To complete the card I popped the cupcake over the DP using foam squares.
Now on with the hop.......thanks for your visit :)


so clever! I love shaped cards!
ReplyDeleteTotal cuteness Sue, love how you have created the shaped card, I'm so boring it's topfold after topfold in my house lol.
ReplyDeleteFabulous shaped card Sue! So very cute, and clever of you to recreate the inspiration cupcake! Love it!
ReplyDeleteDeb.xx
Your card is so cute and your tutorial so helpful Sue! Thanks so much for sharing this technique - and also the link to the Silhouette tutorial where I found so many other tips! Ann xx
ReplyDeleteWonderful card Sue. You make an electronic cutting machine very tempting :)
ReplyDeleteWow your card is so cute
ReplyDeletei love your card especially not being the formal shape type <3 thanks for sharing, I would love to look at the silhouette and hope Kev might take the hint for my birthday :)
ReplyDeleteHow cute this is! Love it .. So pretty.. Hugs x
ReplyDeleteFabulous shaped card clever idea. x
ReplyDeletethis is so neat, I don't have your current address can you send it to me please...............or are you still on the road?
ReplyDeleteLove the shape and style....fab colour combo and goodies added.xx
ReplyDelete{The Journey is the Start – my personal blog}
Love the shape of this card bit different
ReplyDeleteSuch a fun card, so like the photograph...I think you have nailed it!
ReplyDeleteOh wow, what a cute and clever shape for your card - lovely.
ReplyDeleteMary
Loving this hop, so many ideas from the inspiration image. Glad to join in myself. Great work on the card!
ReplyDeleteSuch a clever card, Cathy x
ReplyDeleteThis is so much fun - gorgeous card!
ReplyDelete