Friday, 27 May 2016

I'm thinking Spring....


Hello,

I have a card to share today using another of my old sets from GKD.  This card takes me back to when I started and it was all about layers and embossing.  I still think this style makes an attractive card, though CAS cards are all the go now.  What do you think?


I used Copics to colour this image and a Spellbinder die to cut it.  Mmm, love these pretty spring crocus flowers. Think I might pop some bulbs in a pot this year :)

Thanks for taking the time ......

 photo Signature_zpsba959cfc.png

Sunday, 22 May 2016

Unpacking boxes is a bit like Christmas.....


Hello,


My first Christmas card this year........I can't quite believe it!

Whilst Blog surfing I noticed cards made for a Christmas Card Challenge, which kinda fitted in with my post toady. A search of my Christmas stamps brought out this one that hasn't been used for a while!!!


One of the first sets of stamps I bought was from Gina K in America, so I picked this pretty Christmas image designed by Teresa Mombar for GKD.  Stamped in Memento ink so I could colour with my Copics. 


A loopy die cut to match the coloured bow and a few Sprinkles to complete......easy peasy!
Thanks for taking the time  :-)


Where we're at:


The picture below was taken when we started collecting our boxes from the storage unit, back in March.

I thought I had a great system with all my boxes numbered and a typed list of what was packed away into each box.  What I should have arranged was for the removalist to stack certain boxes last. That is towards the front of the unit.  All my kitchen stuff seemed to be at the back and garage/garden equipment at the front.  So that was a fail!

When it was time to move in, we spent ages sorting through the unit, taking around 6 boxes at a time back home to unpack.  Poor Ian was beside himself by the end, though still thought it was better than having the removalist do the second run!

Unpacking boxes is a bit like Christmas. Well it is when you haven't seen stuff for twelve months! 
HOWEVER,  we realise now....
 a. we had loads of storage space in the last house.
 b. we keep way too much stuff.


xx

 photo Signature_zpsba959cfc.png

Tuesday, 17 May 2016

Stationary requirements.....


Hello again,

Sharing a couple of quick makes today to fill in whilst we're on holidays :)

As the moving day got closer I realised there were a few people I needed to send our new details to. Most family and friends received the information with a Christmas card but there were a few 'locals' I needed to cover.
I wanted something quick using supplies I had in 'the van'.  


A pack of small cards with matching envelopes from  the Reject Store.  This sweet set from Avery Elle, washi tape and my intense pencils.


I very quickly made enough to get into the post as soon as we moved in!


Needed a few random cards and some change of address stickers too.  These hand made envelopes are quite easy to cut  or if you have an envelope maker,  mine, sadly is still in a box somewhere :( . 

If you have a silhouette they are a breeze and the sketch pens do a reasonable job of adding the address if you don't care for your own hand writing.


The liner on this striped envelope had been extended to give me a plain panel for a hand written address.

My basic cutting file came from Maritza  (thank you), go take a look around her lovely blog.Lots to inspire :)


Thanks for taking the time.........

 photo Signature_zpsba959cfc.png

Thursday, 12 May 2016

And now for something a little different.......


Hello,

When I first started on this blogging journey I named my blog 
a consuming passion ...with all things craft,
thinking that I would share more than just my handmade cards and paper projects.  Cards took over pretty much from the get go, with the occasional sewing project thrown in, but not many.

Being away in the caravan  with limited space and still wanting to do something creative, I did a bit of crocheting. Starting with a couple of round 'baskets' some little slippers and a small stash of 'granny squares' ready for a throw.  


As the weather cools down here I think I'll be getting on with this little project.

You might have noticed on one of my last photos HERE I'm working on some English paper pieced hexagons to make a table runner. Another little project started whilst we were away ready for the new house :-)  More about that later.


Today though, I'm sharing something quite different that still comes under my crafty pursuits.


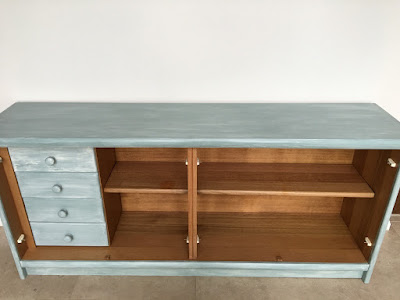
This Buffet or Sideboard as I call them, was one of the first items we bought when we moved to Sydney from the UK all those years ago.  It moved with us and has served us well in three homes. However in the new house it just didn't go and I was loath to part with it.
I knew just where I wanted to stand it but it needed a face lift.
Enter Annie Sloan chalk paint!


I bought this book which is full of great colour inspiration,
 found a supplier locally who also offered a class to learn the basics, so off I went.
My first project consisted of a couple of picture frames and a vase that I crackled.


Then I jumped right in and started on the sideboard, removing doors, handles and drawer fronts I masked the inside.  I'd decided to leave this in its natural state.  A good wash then two coats of Duck Egg Blue. (my piece was very dry so it took 2 coats)  Next a wash of warm white paint, just to give the piece a soft beachy look, a clean dry cloth took some of the white paint back.
I let the paint dry overnight before adding two coats of clear wax to finish off.


Here it is in situ, what do you think?


I'm happy and 'the boyfriend' likes it too.  For a couple of days work I get to keep my sideboard and the storage it offers.
My sideboard is a great space for photo taking, so you'll probably see it often :-)

Thanks for calling past today.........


 photo Signature_zpsba959cfc.png

Sunday, 8 May 2016

Happy Mother's Day


..........well for America and Australia at least, the UK celebrated some time back!


Hello again,


I saw a pretty card over at Beverley's blog for the 


These pretty colours are just perfect for the beautiful  Autumn weather we're enjoying on the mid north coast of Australia.


I used stamps and a die from Uniko Studio  for todays card.


The sentiment strip uses a Dylusions Stencil (Dotty Flowers) and some spray ink. Celebrate is stamped in Black and this panel is adhered over the card using foam tabs,


This weeks Wednesday Challenge at Simon Says Stamps calls for the use of a stencil....so... perfect!


~~~~~~~~~~~~~~~~~~~~~~~~~~~~~~

Where we're at:

In order to complete todays card, I had to find my Cuttlebug cutting boards which unfortunately were in the few remaining craft boxes stacked in the garage!  The Boss was not impressed but it meant that I unpacked one more box, so not all bad. 

We said goodbye to new caravanning friends who are heading north following the sunshine.  Not that the weather is anything other than glorious here at the moment.

It's been a busy week as we get ready to fly over to the US !!  We're off to Disney to meet up with the Liverpool family for a fun get together...........14 of us including 5 littlies :).  Should be fun we've never been to Disney and we've planned a few days in Houston on the way back home.

The house is coming along, more blinds fitted with shutters to come.  We had to admit defeat and order two new bookcases, between us we have 'lots' more books than we thought and nowhere to put them!

We've just had a fence added to the side of the house which encloses our garden nicely.  Mind you once the hedge grows you won't really see it from the front....LOL.

I'm sharing another little project I've completed here on the blog soon.......something a bit different.......  Can you guess?

Thanks for calling past, hope you're enjoying a lovely weekend.

 photo Signature_zpsba959cfc.png

Tuesday, 3 May 2016

Reconnecting.....


Hello,

What fun to reconnect with some of my favourite stamp sets.  

Mother's Day called for a card for my dear Mum .....87 this year. She lives and takes care of her two storey home with a pretty garden on her own.....amazing!


I wanted a bright cheerful card so chose this lovely set from Annabelle Stamps. Stamping to cover a piece of bright white card in the inks above. 


Once happy with the layout I added the sentiment in black ink and some bling.
Adhering the stamped layer to black card before adding to my top fold card made the images pop!


Love the font for this sentiment and the gold inked flower centres.


Thanks for taking the time today.............

 photo Signature_zpsba959cfc.png