
Interesting links:
1. Wedding Shoe Favor Box
2. Fuzzimo.Com - Great Resource for Digital Scrapbookers and card makers.
3. Amazing Paper Grace - Becca's Mitred corner frames from a border punch.
4. Chickabug Blog - Fun Free Printables.
5. ishareprintables.com -Fun Free Printables.
6. http://www.catscreativeplace.com/ - 2012 Calendar Templates (follow the download freebies).
7. Far Far Hill - Wonderful vintage printables.
8. Hero Arts - Colouring with Prisma's
9. Bunny Hill Designs - This fabulous Quilt Store (check it out) has a pretty free set of Christmas Tags.
10. Printable stationary.
11. Free Printables frm the Tip Junkie.
12. Raggedyscrappin - free printables.
13. Free Christmas Papers
14. Check this site for: How to choose colours using the Copic Colour wheel.
15. Lots of Free Household Printable Templates HERE
16. Free Printable Vintage Valentine sheet.
17. Free Printable Vintage Backgrounds HERE
18. Lots of goodies HERE
19. Free Printable ledgers HERE
20. Stampinton have some wonderful templates HERE
My Tutorials:


This next photo shows clearly the score lines you'll need to line up.


No. 9 Triangular Card Shape PDF file HERE.
No. 8 Christmas Treat Box - Nov 2013


I hope you have fun with these......Merry Christmas!
No. 7 Pretty Cute Gift Set.


No. 5. Poppy Poem Gift Set.

No. 5 Making templates for stamp matching dies.
(This is how I work with Heartfelt Creations stamps and matching dies.)


No.4 The way I make a four layer rose with Spellbinders Rose Creations Die.


No 3. Cutting and scoring details for a small gift box.


No 2.


No 1.

1. Wedding Shoe Favor Box
2. Fuzzimo.Com - Great Resource for Digital Scrapbookers and card makers.
3. Amazing Paper Grace - Becca's Mitred corner frames from a border punch.
4. Chickabug Blog - Fun Free Printables.
5. ishareprintables.com -Fun Free Printables.
6. http://www.catscreativeplace.com/ - 2012 Calendar Templates (follow the download freebies).
7. Far Far Hill - Wonderful vintage printables.
8. Hero Arts - Colouring with Prisma's
9. Bunny Hill Designs - This fabulous Quilt Store (check it out) has a pretty free set of Christmas Tags.
10. Printable stationary.
11. Free Printables frm the Tip Junkie.
12. Raggedyscrappin - free printables.
13. Free Christmas Papers
14. Check this site for: How to choose colours using the Copic Colour wheel.
15. Lots of Free Household Printable Templates HERE
16. Free Printable Vintage Valentine sheet.
17. Free Printable Vintage Backgrounds HERE
18. Lots of goodies HERE
19. Free Printable ledgers HERE
20. Stampinton have some wonderful templates HERE
~~~~~~~~~~~~~~~~~~~~~~~~~~~~~~~~
My Tutorials:
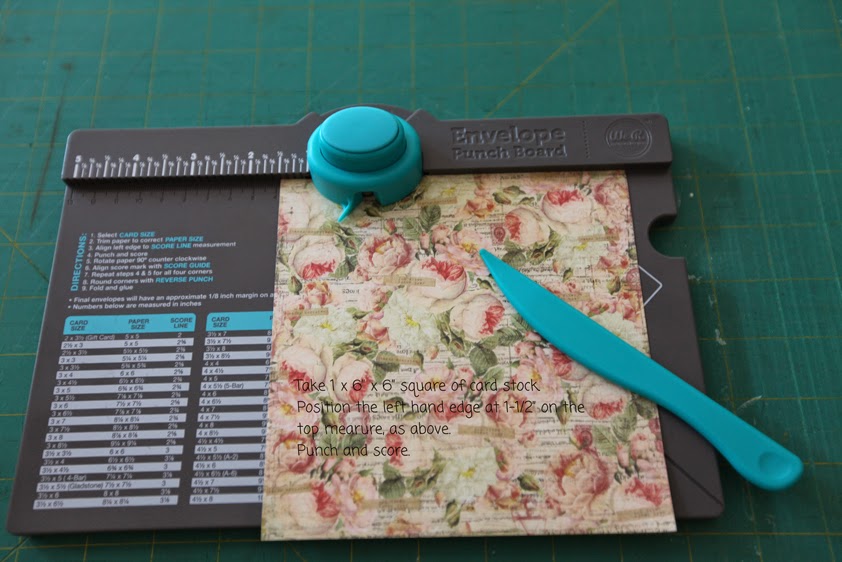
No.10 Easter Treat Boxes using the Envelope Punch Board
This next photo shows clearly the score lines you'll need to line up.
~~~~~~~~~~~~~~~~~~~~~~~~~~~
No. 9 Triangular Card Shape PDF file HERE.
~~~~~~~~~~~~~~~~~~~~~~~~~
No. 8 Christmas Treat Box - Nov 2013

1. Print
the PDF cutting file that you can find HERE to your chosen card stock.

2. Print the cutting sheet to A4 or American
Letter card stock. The solid lines are the cutting lines with the dashed lines indicating
score and fold lines.
The <<<
>>> show where you need to add a slit using a craft knife.
(note: - you will notice the top point is
slightly rounded. This will let you add some twine or ribbon for hanging)

3. Once
the box is cut out score and fold on the score lines.

4. Although I've marked the spots for the
addition of double sided tape, this box stands quite well without. Fold
your box and mark the points either side of the tab for the correct position to
cut your slit. Use a craft knife to cut the slit.
Once the tab is pushed through the
slit the box will stand nice and flat.

5.
5. Open your box out and
stamp your chosen image within each scored segment. Add labels and embellishments.
6. 6. Double a length of fine hemp twine or ribbon and knot it with the two ends together to
make a hanging loop. Using a small piece of tape adhere the loop to the
inside of the box.


There you have it, add a little something to each of your
boxes for Christmas guests.

These little boxes stand on a 2" square base and are 4.5inches high.
I’ve used stamps and Embellishment from AnnaBelle Stamps to
decorate mine.
~~~~~~~~~~~~~~~~~~~~~~~~~~~~~~~~~
No. 7 Pretty Cute Gift Set.


Pretty Cute – Boxed Gift Cards Set.
Gift Cards:
1.
From 12 x 12 Smooth Black card cut two strips at
2.5” wide and cross cut at 5” to make 4 x 2.5” side fold gift cards.
2.
From Teresa Collins DSP die cut two circles
using a Spellbinder die. Cross cut to make a total of 6 x ¼ cut circles. One
for each gift card, one for the box and one to add to the 4” card.
3.
Stamp 4 images from YUKI – Pretty Cute so smooth
white card using VersaFine onyx black ink. This will ensure a good stamp of the
small detail on these stamps.
4.
Die cut the stamped images using a Spellbinder
Classic Large oval die (2nd smallest). Add some red colouring to
each image with a Copic Marker. Adhere one to the front of each gift card.
5.
From scraps of red card die cut 6 sets of two
layer Party Petals flowers. Shape and layer each adding a dew drop to the
centre of each. Adhere one to each gift
card.
6.
Add a small white die cut circle to the inside
of each gift card for a written message.
Gift Box:
1.
From Smooth Black card cut a strip measuring 8.5”
x 4.25”. Score along the 8.5” side at 2.75”, 3.5”, 6.25” and 7”. Turn and score along the 4.25” side at .75”
and 3.5”.
2.
Trim down to the top 2.25” on both sides to form
the top flap. Trim in to
from
the bottom flaps at the 2.75” and 3.25 score lines.
SEE THE
PICTURE aaa
3.
Using a Spellbinders Label 4 die shape the top
fold down flap. I positioned the die
over the card and placed it on the Cuttlebug at the very bottom edge of the
cutting board to ensure it cut just the edge I wanted.
4.
From red DSP cut a second shape using the Labels
die and adhere this to the front of the fold down flap.
5.
Using strong tape to adhere fold and make up the
box. Add the ¼ cut circle to the front
of the box and a two-layer flower to the middle of the fold down flap.
6.
To secure the flap cut a slit in the front of
the box so the die cut point on the fold down flap slips inside.
4 x 4 inch side fold card.
1.
From Smooth White card cut score and fold to
make the card base. Using a Black atyou Spica pen add some faux stitching
around all 4 sides of the card base.
2.
Trim some smooth Black card to 3.5” square and
using a ScorePal score all four sides at .25”.
3.
Add a red ¼ cut circle to bottom right of black
card.
4.
Stamp an image from YUKI Pretty Cute along with
the sentiment to Smooth White card. Die cut and emboss both using and oval and
Label 4 die respectively. Add some red
to the image with a Copic Marker.
5.
Adhere the oval image to the scored black card
followed by the sentiment, which is popped up, on foam tabs. Add the final
double layer flower to the top left corner of the card.
6.
To complete adhere the black card to the card
base.
~~~~~~~~~~~~~~~~~~~~~~~~~~~~
No. 5. Poppy Poem Gift Set.

Directions: Card
1. Score, trim and fold black card to make 4.25 x 5.5 inch top fold card base.
2. Stamp designer woodgrain to ivory card in crimson ink and trim to 4.25 x 5.25 inches.
3. Die cut the ‘edge only’ from crimson card, trim and adhere to left side of card front.
4. Stamp Poppy Poem image to ivory card in tuxedo black ink and colour with Prisma’s and OMS.
Trim to 21/8” x 4-1/8” and layer over black card.
5. Add a loop of red/white spot ribbon beneath image. Add image to card front on a slight angle.
6. Punch 5 scalloped circles from ivory card. Emboss with Swiss dots embossing folder then sponge
using crimson ink.
7. To assemble the flower fold 4 of the sponged circles in half then half again. Add glue to the 5th
scalloped circle, which is the base of the flower. Add the four folder scalloped shapes to the base.
8. Thread the red cotton twine through the button and finish with a bow. Adhere to the centre of the
flower. Adhere the completed flower to the card front.
9. Add the completed card to the black base card.
Gift Box: 2.5" x 5.75"
1. From ivory card cut 4 x 2-3/8” x 5.5” strips. Stamp with Designer woodgrain using crimson ink.
2. Trim second sheet of ivory card to 5.75 x 11 inches. Score along the long edge at 2.5”, 5”, 7.5”
and 10”. Turn and score along the short edge at 2.5”. Snip up to the 2.5” score line along the base,
removing the bottom of the 1” tab. Fold and press with a bone scorer along score lines then open out.
3. Adhere the stamped strips to the 4 sides of the box. Assemble box using Zip Dry glue along the 1”
tab. Fold in the bottom flaps and adhere with Zip Dry glue.
For the Box Lid.
1. Cut a 4.5” square of black card score at 1” and 3.5” on each side and cut up to the score line to
create flaps.
2. Fold on all the score lines; glue the flaps in place to make the lid.
3. Add two strips of red/white spot ribbon across top of lid securing inside lid.
4. Make up flower as for the card adding a button finished with red cotton twine.
5. Adhere the flower over the centre of the lid adding a loop of red/white spot ribbon to complete.
~~~~~~~~~~~~~~~~~~~~~~~~~
No. 5 Making templates for stamp matching dies.
(This is how I work with Heartfelt Creations stamps and matching dies.)


~~~~~~~~~~~~~~~~~~~~~~


~~~~~~~~~~~~~~~~~~~~~~~~~~~~~~~~~~~~~~~~~~~~~~~~~~~~~~~~~~~~~
No 3. Cutting and scoring details for a small gift box.

Click on image for better view. Not intended as a printable template.

~~~~~~~~~~~~~~~~~~~~~~~~~~~~~~~~~~~~~~~~~~~~~~~~~~~~~~~~~~~
No 2.

Heartfelt
Creations Bella Rose Coffee and Cream Heart Basket -
H C Products: HCPC 3402 Bella Rose Heart PreCut Set
HCPC
3394 Classic Bella Rose PreCut Set
HCPC
3400 Bella Rosebud PreCut Set (Sentiment)
HCD
712 Bella Rose Die
Spellbinder
Heart Die - plain and scalloped.
Spellbinder's
Classic Lace Border die
Spellbinders
Grand Calibur.
Other Products:
Card: Ivory
Card, Cappuccino Card (light coffee).
Ink: VersaMark,
clear embossing powder, Chalk inks in cocoa, mint. Sakura Stardust Clear glitter pen.
Other: 2
eyelets, 2 brads. Silent Setter. Fiskars
‘leave it to weaver’ eyelet punch. Self-adhesive pearls. 5/8” coffee
ribbon and scrap of green 3/8” ribbon. Cream
lace. Cream glass beads.
Zip Dry
Glue, Art Glitter dries clear adhesive, Foam Tape.
Instructions: Basket
– Template available HERE.
Print the Heart Basket template directly to Ivory card. (I printed to A4 with the setting set to
borderless but this will print fine on American Letter size card). Cut out.
Place eyelets in either side ready for the handle. (See pic. 1 &amp;amp; 2.)
(You could just punch holes and thread ribbon for the handle if you prefer.) Place
strong tape or Zip Dry glue along the .5-inch flap and adhere to inside front
heart shape.
1.
From along one long edge of the remaining Ivory
card using a Fiskars ‘Leave It To Weaver’ punch; punch out a ribbon eyelet
strip. Trim to .75” wide. Thread a length of coffee 5/8” satin ribbon through
the punched eyelets leaving the first and last free. Secure on the reverse with Zip Dry glue. (See
pic. 3)
2.
For Back
of Basket: Using the largest Spellbinder scalloped heart die cut and emboss
one heart from coffee card. Using the 3rd
smallest scalloped die cut one heart from Ivory card. Stamp the sentiment from Bella Rosebud using
cocoa chalk ink. (A stamp-a-ma-jig will help placement.)
3.
Die cut a small piece of Spellbinders Classic
Lace from Ivory card. Trim to sit over the bottom half of the heart. Add a strip
of coffee satin ribbon to the top, securing at the back with Zip Dry glue. Add the sentiment to the centre of the heart
with foam tape. Add the pearls to the
scallops. Using Zip Dry ink Adhere the
completed back section to the back of the heart basket. (See pic 4)
4.
For Front
of Basket: Stamp Image from Bella Rose Heart to Cappuccino card using
s.e.i. cocoa chalk ink and clear emboss. Trim or die cut image with matching
scalloped nestie. Lightly colour with
s.e.i. chalk inks and a cotton bud. Add accents with Sakura clear glitter pen.
5.
Stamp single open rose, closed rose and rosebud
to Cappuccino card using s.e.i. cocoa chalk ink and colour with chalk inks.
Using matching dies cut all images and pop up over the main stamped image with
foam tape.
6.
Gather a length of cream lace by running a small
running stitch along the top edge of the lace and pulling to gather. Using an awl pierce a hole in the dots placed
in each scallop of the stamped image.
(This will make it easy
to attach the lace.)
7.
Thread a needle with cotton, double it and
secure with a knot. Insert the needle into the lace and come up from behind the
stamped image into the hole at the base of the heart. Add a glass bead then take the needle back
down through the hole and the lace (without going back through the bead) and pull
firm. Continue in this way around the
heart arranging the gathered lace as you go.
When you get all the way back to the base of the heart, sit the lace to
the back of the started piece and add a few tiny stitches to neaten off. Take a couple of small backstitches to secure
and snip of the remaining thread.
8.
Use foam tape and dries clear adhesive to attach
the completed front section to the front of the heart basket.
9.
Tie two bows in the coffee ribbon and secure
these either side of the basket handle to complete.


~~~~~~~~~~~~~~~~~~~~~~~~~~~~~~~~~~~~~~~~~~~~~~~~~~~~~~~~~~~
No 1.
BIRDHOUSE - PDF File required - email me and I will send it.

I Cereal Box.
2 A4 sheets of medium brown card stock. (Referred to as MBC)
1 A 4 sheet of Dark Brown Card stock. (DBC)
1 piece of white card 4.5 x 8 inches. (Roof Lining)
Jute
ScorPal
Spellbinder small circle die.
Spellbinder scalloped Square die.
Woodgrain Embossing folder.
Cuttlebug.
Craft Smart Spray Adhesive.
Read all instructions before you start.
Trace or print Pattern directly to MBC.
(The pattern comes in 2 parts the front and sides make up one and the back the second.)
Cut on cutting lines,
Use a small circle die to cut the hole in the front of the Birdhouse.
Use this cut out pattern of front/side and back to transfer the cutting lines to Cardboard (Cereal box).
Cut out the cardboard 1st layer. Score along the fold lines, fold then open out.
Use the Medium brown card front to mark the circle into the correct position on the cardboard and cut with the Spellbinder circle die.
If you want to emboss the MBC birdhouse using a Woodgrain embossing folder do that now. It’s a bit of a fiddle; I did the front then each side.
Using the spray adhesive spray a good coat to the cardboard and adhere the MBC over the top making sure to line everything up. Put aside to dry completely.
Using the Scalloped square die cut one square from cardboard and one from MBC. Spray with adhesive and adhere. The base measures 4 inches from edge to edge.
Once the sides of the birdhouse are dry re fold along all the fold lines sides, top and bottom. Using strong craft glue, glue along the side folds and add the back to the front and sides. Apply some pressure to the glued section for a moment to make sure it holds well.
Glue along the bottom folded in section of the birdhouse and centring this over the MBC of the base adhere. Hold for a moment to ensure a good hold.
Put aside to dry.
For the roof score and fold the 4.5 x 8“ white card to give you a piece 4.5 x 4“
From the Dark Brown Card punch or die cut enough scalloped strips to cover both sides of the roof. I used a Quikutz die that gave me a 1” deep scallop x the width of my A4 card. This meant with a slight overlap it took 5 strips to cover each side of the roof.
Start ‘laying’ the roof over the white card from the bottom edge of one side (I overlapped the white card by the depth of the scallop. Lay the scallops so each row is even and if possible so the scallops match at the ends. You can trim off any excess on completion.)
Complete the second side in the same way meeting at the top of the roof.
For the Capping cut a 4.5 x 1 inch strip of DBC and score at .5 inch and fold.
Hold the capping in place over the top of the roof and with a single hole punch (I used a .25 inch one); punch a hole at the mid point through the roof and the capping.
Using double-sided tape, tape both sides of the capping over the top of the roof centring the punched hole.
Form a loop from an 8-inch length of jute and thread it through the punched hole. Tie a double knot in the end to secure the loop inside the Birdhouse.
Now you’re ready to glue the roof onto the Birdhouse. Apply craft glue along the top folds of the walls and position the roof to sit over the top. (I had less overhang to the front of my birdhouse so I wouldn’t over shadow my Cardinal ….you can decide how you want yours to look.) Once the roof is in position apply a little pressure to make sure of a good bond.
Take another length of jute and tie a bow to sit at the base of the hanging loop.
Decorate your Birdhouse any way you like.