Thursday 28 July 2016

Cheerio!


I needed a card for friends flying off on holiday very soon,  so with that in mind.......


Tools:
I have this cute little Biplane  image from We R Memory Keepers. 
The sentiment is from Waltzingmouse.
Annabelle Stamps Clear Sprinkles.
Memento Inks -  Summer Sky, Lady Bug.  Versafine Onyx Black

Method:
A little cloud masking and sponging for the sky background. 
Stamping then hand cutting the Biplane before popping up over the  cloudy sky background using foam dots.  
Once the sentiment was stamped the completed panel was added to my white top fold card.
A few clear Sprinkles to complete.


Every time I use this image I think of a pin on my Pinterest board here. It has to be one of the most re-pinned items I have :)


Thanks for dropping by today, see you soon.......


 photo Signature_zpsba959cfc.png

Monday 25 July 2016

To Plan or not to Plan


Hello,

My day wouldn't be complete without a visit to Pinterest.  I'm sure I'm not alone.  I have so many collections over there...... of all kinds!

I've been thinking of late that perhaps it's time to cull some, maybe discard the ones I've no further interest in, or those I've tried and added to my repertoire. Time consuming but for this 'neat freak' the idea appeals . Does anyone else do this?

Recently I've been fascinated by folded book art, I'm not sure  about the words but I've seen some amazing hearts.  Don't be surprised to see something here one day :)

For a while too, I've been following Planners, Filofax and Journal 'keepers'......is that what you'd call them?  I really admire those people who keep a diary and make it a thing of beauty.   I always had a Filofax in my handbag when I was working. It's lounging on a shelf these days. I couldn't have managed without one, but it's something I've let slip.  I do have a stack of notebooks around the place thought, keeping different ones for household stuff like window sizes, paint colours, that kind of thing.  Sewing notebooks with lists of all my different thread colours, needles and sewing machine feet. I always take a notebook away with me when we travel too, but it would be great to have a system that keeps everything together or at least that is inter-changeable.

Can you guess where this is leading?  I thought a Midori Travellers Notebook might be just the thing for me. A compact folder I could switch around depending what I needed at any given time.


If you don't know, the Midori is  a leather folder with elastic running down the spine to enable notebooks to be  inserted.  The original  inserts come in various designs, lined, grids plain etc.

Faux Midori's are everywhere around the web, and to be honest if you can get hold of some reasonably stiff leather it's not hard to make your own.  Notebook/Diary printable pages are available through etsy as well as quite a few very generous people offering their versions to download for free.
Search Pinterest, you'll see the favourites popping up often.  You can add pen holders, book marks and all kinds of charms and decoration to personalise your notebook.

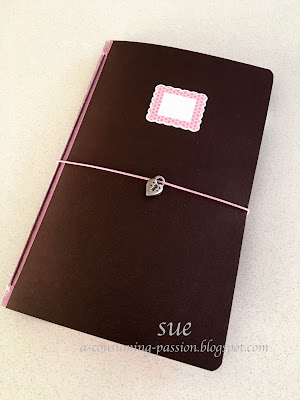
I thought before I purchase a Travellers Notebook I'd have a go at making a 'Card Dori' using some heavy weight brown card. Mine measures 8.75 inches x 5.5 inches wide (wider than the real leather ones).

I dyed my elastic using a pink Copic marker adding a small heart charm.


I also downloaded a free insert to print, just to see if I'd use the Daily Planner. 
A couple of sites offering free downloads are  Here and Here .


I found Ray Blake's fabulous blog and his youtube site  with so many great tutorials.


 Ray designed the file pocket I added to my  Card Dori :)


I snagged some great images HERE to cut as stickers for my  Planner.  Easy to do with a Silhouette Cameo :)  Small stamps are perfect for page decoration along with Washi Tape, if this is your style.

Browsing Instagram I've seen so many creative planners that also include beautiful calligraphy.  How cool to see beautiful penmanship becoming so fashionable again.


What about a 'Fabric Dori"  I made this one on a wet afternoon and this time I got the lacing right for the spine elastic.

It looks much better and....... fancy..... I got to use some eyelets and my self setter! It's been a while since they've seen the light of day!


Adding a pocket along the bottom of the inside lining seemed like a good idea. Then (of course) once it  was sewn up I thought I should have added a pen loop :(.
Now, just need to add a couple of notebooks.


I also read that LG make a pocket printer....gasp!  It connects to your mobile phone enabling you to print off a photo straight away. Now you can add photos directly to your travel journal.  So cool and definatley on my wish list!

So thank you once again Pinterest, I've enjoyed jogging around seeing everyone's ideas and as always am amazed at how many crafty people are super generous, sharing !

Oh yes, in case you're wondering,  after mulling over all the different options (and there really are lots) I finally ordered one. The genuine Midori Travellers Notebook all the way from HERE in the UK.      It has some travelling to do before arriving in my mail box LOL!


Thanks so much for your visit today :-), till next time..........


 photo Signature_zpsba959cfc.png

Wednesday 20 July 2016

Bits and Bobs Notelets.


Hello,

After having a 'craft room tidy' I was left with some odds and ends on my table.  So rather than throw them in the bin I thought I'd use them to make some small 4" noteletes  which are always good to have around.

The background paper was the last of some embossed card and just enough for my 4 cards, well with a little improvisation! (see the card below which is a white base card).


I used up some die cut shapes that were in my 'just in case' file. Not sure how long ago I started that one but it clearly didn't take off.  The strips of DP are bits I'd popped back into 6x6 inch paper pads..........again not one of my better ideas. 'Use it or throw it' is my motto after our last house move!


I cut the envelopes using my Silhouette Cameo and sheets from a 12 inch paper pad that I'm trying to get through!  The address stickers were also cut on the Silhouette.

Mood when finished:   Good, it's amazing what you can do with odds and ends :-)

Thanks for dropping past, till next time......

 photo Signature_zpsba959cfc.png

Sunday 17 July 2016

Monochromatic with a touch of RED


Good Morning,

I hope my Australian friends are keeping warm.......It's our first winter in Australia for a few years so the boss and I are feeling these cold evenings.......or is it an age thing?  :(

I thought I'd share a card using another LOTV image
.
When I coloured this image I had in mind old photos given a pop of colour, I love the look!
 I used my Copic markers today, W and R with some flesh tone E's.   

To my eye they look taupe though here they look more grey!


Another 5 inch square card using dies for the doily and circle.  
I popped some sponge tape behind the balloon to pop it up a little.


I used Wink of Stella clear to add some sparkle around the balloon and on the roses. 


The sentiment comes from a 6 x 6 paper collection and just seemed to fit.
I think this would make a good anniversary card don't you?


Challenges:  
Creative Moments Challenge #97 - Anything Goes with a twist of ribbons and/or bows.

Thanks so much for taking the time to call past today.........till next time.

 photo Signature_zpsba959cfc.png

Saturday 9 July 2016

Birds, Plants and Alphabets.....


Hello, hello,

It's a cold, wet Friday as I write this post.  Perfect weather to stay inside with computer, printer and all sorts of other bits and bobs!

I've got quite a collection of  downloaded files from Creative Market. Today I'm using one of them. Infact,  it's one of this weeks FREE files from  the artist Daria Miazhevich . 


I just love the colours she uses.  This Alpha  I thought was perfect to cover a lined notepad.


I've used another of the patterns to create labels using my Silhouette.  Mmm love the birds on this one.


For the white labels I just cut away the bird to use.  I also added my sentiment before printing of the labels, then cut them on the Silhouette.   Some Sprinkles to add a little shine.


Here's the finished project. I printed a sheet of A4 paper to use for wrapping..... did I say I love this pretty design???  


Thanks for taking the time today   :-)


 photo Signature_zpsba959cfc.png

Thursday 7 July 2016

Sharpie Fun.......


Hello,

I picked up a bunch of Sharpie pens whilst we were in America........not that we can't get them here, we can, but Walmart had these for $10US ....BARGAIN!  I only went in for milk, you can imagine what the boss said :)


I had in mind trying a watercolour effect on some plain clothing..........OK not today, but I'm working up to it.

I have, instead made some bookmarks. Always handy to pop in with thank you cards!


These started life as a 2 litre plastic milk container.  


If you want to try here's the what and how! 

What you need:
Coloured Sharpie markers (4), 2 litre plastic milk carton, Isopropyl alcohol  (available in Bunnings here in Australia), household scissors, corner rounder, Spray can of Varnish, twine and beads or ribbon to embellish.

How to:
  • Add some boiled water to a clean, empty milk carton. This heats that horrid glue they use to add a label.  After a minute the label should come off clean.  Any glue left can be taken off using eucalyptus oil.
  • Using household scissors cut down the centre of one side of the carton. (the one without the handle :) )  The flat bit front and back of the carton was what I used.
  • Cut  two strips from the front and two from the back of the carton. Round the corners and using a whole punch, punch a hole in the centre of the top of each strip.
  • Now the fun bit, using several Sharpie markers fill each strip with colour. 
  • Next you drip dots of Isopropyl alcohol randomly over the coloured plastic strips and watch the colours meld into each other.  ( if you lay the coloured plastic flat you get the circles but on my pink and purple ones I held them up to let them  run.)
  • Once dry, (it takes no time at all), a light spray of varnish will stop the colour from rubbing off
  • Thread some twine through the punched hole and decorate with a few beads.  


This was a fun little project for a rainy day.


Thanks for calling past today, see you soon.................... 
 photo Signature_zpsba959cfc.png

Saturday 2 July 2016

Popcorn Bear Challenge card.......


Hello,

I love to colour this Popcorn Bear and thought he'd cheer up my Mum. She's worrying about the situation back in the UK and says she hates turning on the TV because it's all doom and gloom.....poor thing.


I masked an area for the bear before stamping the background.


Coloured using my Prisma's then cut away the right side.  I also stamped a second flower to hand cut and pop up for some dimension.

Some clear Sprinkles to finish before popping the image up on foam tabs over a pink top fold card.


Challenges:

Time Out Challenges #60 is to CASE one of Therese's cards....  Love all her cards so had to join in :)


Simon Says Wednesday Challenge  'Anything goes'


LTSCB # 80 - Anything Goes


Thanks for calling past today, have a great weekend.........
 photo Signature_zpsba959cfc.png