Wednesday 31 August 2011

Heartfelt Creations


Hello,
Two projects to share today from the Heartfelt Creations sets.  You can see the designers projects on the Heartfelt Creations Blog or go pay a visit to each designer........links are under the DT Tab at the top of my page.


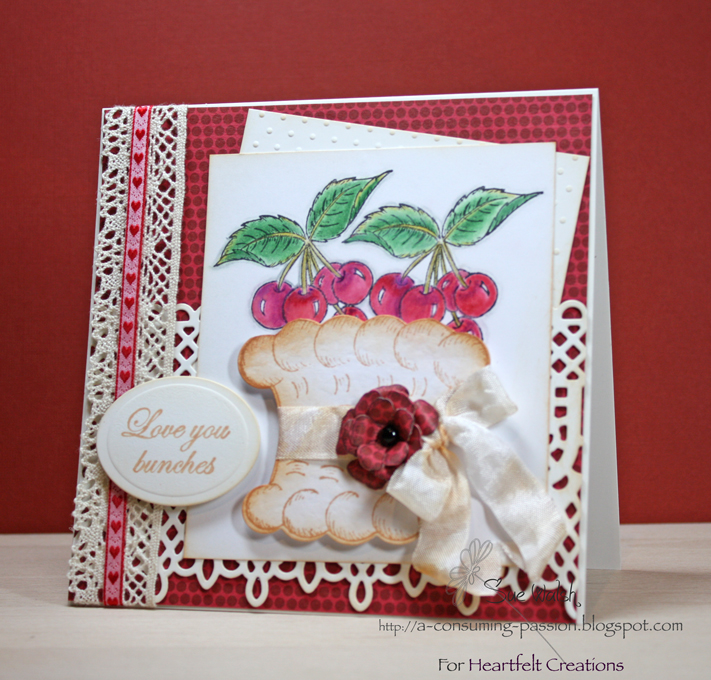
6-inch square top fold card

HC Products:  HCPC 3411 Woven Basket PreCut Set
                        HCPC 3387 Luscious Cherry Swirls PreCut Set
                        HCPC 3412 Botanical Floral Basket PreCut Set – Sentiment
                        HCPC 3406 Botanical Floral 1 PreCut Set
                        HCD 714 Decorative Basket Die
                        HCD 713 Lace Die
                        Spellbinders Rose Creations Die
                        Spellbinders Classic Oval Die
Other Products:
                        Cason ivory card. RomanPrint: white card and hammered white card. Websters Pages DSP. Rangers tea dye distress ink. Memento tuxedo black ink. Prisma pencils and Gamsol. Cuttlebug Swiss dots e.f. Cream crochet trim. Vandoros red heart ribbon. Hug Snug seam binding – dyed with tea dye ink. AnnaBelle black Sprinkle. Stamp-a-ma-jig.
Zip Dry glue, Dries Clear adhesive and Paper Mill adhesive foam dots.

Instructions:
Trim, score and fold ivory card to make a 6” square top fold card.
1.     Stamp the woven basket in tea dye ink to the white hammered card. Using the matching die cut the shape. Trim off the handles.
2.     Stamp the bunches of cherries twice to some white card using the cut out basket and a stamp-a-ma-jig to work out placement. Colour with Prisma’s and Gamsol.  Trim image and sponge the edges with tea dye ink.
3.     Trim and emboss some Cason ivory card using the Swiss dots e.f. Sponge edges with tea dye ink.
4.     From more Cason ivory card die cut a piece of lace, trim to 5-7/8” sponge edges with tea dye ink.
5.     Trim red dsp to 5-7/8”square. Add the embossed ivory card on an angle using Zip Dry glue. Add the lace die cut layer next followed by the coloured cherries.
6.     Wrap the tea dyed seam binding around the basket and tie in a bow to the side.
7.     Stamp a three layer rose to dsp using tuxedo black ink. Using the matching dies cut the petals out. Shape and assemble one rose adding a black Sprinkle to the centre. Add the rose to the side of the seam-binding bow. Adhere the basket beneath the cherries with adhesive foam dots.
8.     Wrap the crochet trim with the red heart ribbon centred over it to the side of the card front.
9.     Stamp the sentiment to ivory card in tea dye ink. Cut and emboss with a classic oval die and position on card with adhesive foam dots.
10. Add the completed card front to the base card with Zip Dry Glue.


4.25 x 5.5 inch card

HC Products:  HCPC 3387 Luscious Cherry Swirls PreCut Set
                        Spellbinders Lacey Ovals
                        Spellbinders Classic Ovals
                       
Other Products:
                        RomanPrint White card, ACC red card. Memento tuxedo black ink. Copic markers. Cuttlebug Scrollwork embossing folder. Paper Mill adhesive foam dots. Zip Dry ink. Cuttlebug. The Twinery maraschino twine. Red button.

Instructions:
1.     Trim, score and fold white card to make a 4.25 x 5.5 inch top fold card.
2.     Using the Scrollwork e.f. emboss the front of the card.
3.     Stamp the cherries and sentiment to a piece of white card in tuxedo black ink. Cut and emboss with an oval die. Colour with Copic markers.
4.     Die cut a piece of red card with the lacey oval die.
5.     Using Zip Dry glue adhere the stamped image to the lacey oval red card.
6.     Pop up the completed image to the embossed card with adhesive foam dots.
7.     Lace the maraschino twine through the loops of the oval and tie in a bow through the red button.

  Thanks so much for calling past today.......Till next time............


Photobucket

Saturday 27 August 2011

The Roses Challenge

Hello,

Before I start this post I jut want to let my on-line friends along the east coast of America know you're in my thoughts. I've been listening to the news reports of the destructive force of 'Irene' and hope and pray that you all stay safe and as much as possible out of harms way.

Today being the last Sunday of the month is The Roses Challenge day.
The Roses are a group of on-line friends who take turns to issue a challenge once a month and this month it was Olga's turn.

Olga asked to see some handmade flowers. She was happy for them to be on cards bags or just flowers.

Both Olga and I design for Heartfelt Creations who make gorgeous flower stamps with matching dies so we're pretty comfortable making flowers for all of the above......but today I chose to make a punched flower  using printed book pages distressed with inks.

 I made a little gift set of bag and card as they're always handy to have around. The card measure 4 x 4 inches.


You can find the links to the girls blogs under The Roses tab at the top of my page they would love for you to go check in with them.......tell them I sent you!  Great Challenge Olga......who's next!

Thanks for dropping by today......I'm back again on Wednesday......if not before!  It's been a bit busy with lots of new goodies to play with that I can't share just yet.  AnnaBelle Stamps is getting ready for the BIRTHDAY celebrations Andrea has planned check it out here.   Only 11 Days to go!!!!


Products:
6 x 4.5" white gift bag. Book pages cut with the PI. Hand dyed seam binding. White card. ACC tan card. DSP Melody Rose - Soul Food. Ranger's Distress ink tea die ans tattered rose. LSS Yellow brads x2 . Tattered Angels Glimmer Mist - Iridescent Gold. AnnaBelle Stamps  Squared Posies (sentiment) and white cotton twine. 


Photobucket

Thursday 25 August 2011

AnnaBelle Stamps Sketch Challenge #041

It's time for this week's challenge at AnnaBelle Stamps Blog and we have a sketch.  This one could very easily be flipped to make a tall card what do you think?


Here's mine using one of the sentiments from Stamped For Christmas on the main panel with a couple of Christmas baubles on the circle element......Stamped simply to make a fairly CAS card.


Please join us and add a card for your chance of this week's prize. All the details are below. If you need more inspiration the AnnaBelle Belle's have made some gorgeous creations this week check them out on the Blog or better still go visit with each one. Links as always under the DT tab at the top of my page.

We're counting down to the AnnaBelle Birthday Party that starts with the announcement of the Blinkie winner on Sept. 7th.  You can read all the details HERE or at the AnnaBelle Blog, we're hoping to have a huge party crowd with challenges, prizes and lots of fun.....So come and join us!


Photobucket
Products:
AnnaBelle Stamps On Line Store.
AnnaBelle Stamps Stamped for Christmas. Smooth White Card.   Blossom Sprinkles 6mm.  Pink/White striped ribbon.
SU Sahara sand card. Memento tuxedo black ink. Rangers Distress Ink Scattered Straw. DSP: Cosmo Cricket- Honey Pie digital paper.
Edit: Having trouble with the schedule at the moment the date stamp is wrong.....This post went up at 12 not Thursday pm!!!
About our challenges:
- We post our challenges every Friday at 12:00pm AEST (AEDT during Daylight Savings).
- Each challenge runs for a week, and will close on the Thursday 5.00pm so that we can announce and showcase our weekly winners prior to the next challenge. 
- Each week’s winner will receive our special blinkie to display on their blog and a special little something.  Our last challenge for the month will be a sketch challenge, which will attract our main prize of a $15.00 gift voucher for that week’s winner.

How To Play Along:
- Copy and save our challenge banner and include it and a link back to the ABS blog in your post.
- Please link directly to your entry not just to your blog.
- Please don't link to postings made prior to the date of our current challenge.  All projects submitted must be new.
- A maximum of 7 challenges may be combined including this one.       
- You may enter any challenge several times as long as each submission is with a new creation.
- We would love you to use AnnaBelle Stamps and embellishments, but you can play along without using them, it’s all about sharing ideas.

Tuesday 23 August 2011

Hello,  how are you? I hope your week is going well.

Wednesday is the day  those who love  the stamps and dies from Heartfelt Creations look forward to. The H.C. Blog has a bunch of projects to share that we hope will inspire you.  I'm sharing two cards today, so here goes........

Love you bunches uses the pretty rose stamps and dies for a very femanine card.


4.75” square side fold card.

HC Products:  HCPC 3413 Basket weave Background PreCut Set
                        HCPC 3410 Decorative Basket PreCut Set
                        HCPC 3412 Botanical Floral Basket PreCut Set (sentiment)
                        HCPC 3407 Botanical Floral 2 PreCut Set
                        HCD 714 Decorative Basket Die
                        Spellbinders Rose Collection Die
                        Spellbinders Shapeabilities Parisian Motifs Die
                        Spellbinders Circles Dies
           
Other Products:
                        Cason Ivory Base weight card. AnnaBelle Smooth White card. American Craft Card – green. Basic Grey Origins 6 x6 paper pad. Rangers distress inks: antique linen, scattered straw. Memento tuxedo black ink and bamboo leaves. Snug Hug seam binding. Zip Dry glue and Dries Clear adhesive. Foam mounting tape.

Instructions:
1.     Trim, Score and fold Ivory card to make a 4.75” side fold card.
2.     Trim green ACC to 4-5/8” square and layer with the dsp.
3.     Using antique linen ink stamp the basket weave background to white card. Trim to 4.25 “ square and sponge the edges.
4.     Using scattered straw ink spritzed with water die some white seam binding. When dry tie this over the front of the basket weave layer, finishing with a bow.  Add this to card front.
5.     From green card cut a Parisian Motifs large fancy circle. Add to centre of card front over ribbon.
6.     Stamp the sentiment using tuxedo black ink to white card. Cut using a Spellbinder Circle die. Whilst still in the die lightly sponge and stamp the edges of the circle using the swirly leaf from HCPC 3410 and antique linen ink. Use foam dots to add the sentiment circle to the Parisian Motifs circle.
7.     Using bamboo leaves stamp the swirly leaf HCPC 3410 twice to green card and using the matching die cut.
8.     Stamp the rose petals from HCPC 3407 to white card using scattered straw ink. Cut using the matching Spellbinder Rose Creations die. Lightly sponge the petals and shape to make three roses and two rose buds.
9.     Arrange the roses and leaf swirls to the card front using Dries clear to adhere.
10. Add the completed card front to the base card with Zip Dry ink.

 ~~~~~~~~~~~~
My second card is a quick belated card meant for a male............


4.5 x 5.5 inch top fold card

H C Products:             HCPC 3413 Basketweave Background PreCut Set
                                    HCPC 3414 Belated Birthday Wishes PreCut Set
                                    HCPC 3410 Decorative Basket PreCut Set
                                    HCPC 3319 Simple Filler Stems PreCut Set
Other Products:         Rangers Distress Inks: Antique Linen, Frayed Burlap, Tea Die. Memento tuxedo black. Prisma Pencils and OMS. American Craft Card Tan, Ivory Base Card. DSP Basic Grey origins 6 x 6 paper pad.  Jute.  WEB Self-Adhesive reinforcement. Foam mounting tape. Zip Dry glue. Hole punch. AnnaBelle Lime Sprinkles.


Instructions:
Trim score and fold Ivory card to make a 4.5 x 5.5 inch top fold card.
1.     Stamp Basketweave background to tan card in Frayed Burlap Distress Ink. Trim to label shape and punch hole in top adding the reinforcement.
Stamp the sentiment from HCPC 3414 twice. Once in Frayed Burlap then over stamp in Tea Die ink.  Sponge and distress.  Add the jute through the punched hole.
2.     Using Antique Linen ink stamp the leaf swirl from HCPC 3410 to the DSP and trim.
3.     Matt the dsp to more of the tan card.
4.     Stamp the ladybirds across the bottom of the dsp leaving a gap for the ‘late’ bug. Colour with Prisma pencils and OMS. Stamp one ladybird to a scrap of dsp, colour and cut out to pop up over the ‘late’ bug.
5.     Using foam mounting tape add the label to the stamped dsp.
6.     Add three lime Sprinkles to top of the card.
7.     Add completed card front to base card with Zip Dry glue.


Thanks for calling past today, if you would like to visit the girls from the HC design team you'll find the links at the top of my page under the DT tab.

See you soon............
Photobucket

Friday 19 August 2011

AnnaBelle Stamps - Say It With Distressing


Today's challenge with AnnaBelle Stamps is to say it with Distressing.  I've coloured another of the flowers from Whimsy Flowers popped up over a layer of distressed BBD5 for my card.  I die cut the curved sentiment using an oval die trimmed it down to sit at the top of my card. Sponging, inking and water spritzing with some distressed seam binding complete my card today.


Check in with the Belles, all the links are under the DT tab at the top of my page. The AnnaBelle Stamps blog with have them too.

Don't forget to spread the word about the AnnaBelle Stamps Birthday Celebrations.......there's still time to grab the Blinkie for your Blog..........you could win a prize before the celebrations begin! Click the link in my sidebar or here.
Photobucket
Supplies:
AnnaBelle Stamps: Smooth White Card, Whimsy Flowers, Background By Design # 5, Artichoke Sprinkles.
Other:  Rangers Distress inks: Antique Linen, Scattered Straw and Peeled Paint. Memento tuxedo Black. Prisma Pencils. White Snug Hug seam binding.


About our challenges:
- We post our challenges every Friday at 12:00pm AEST (AEDT during Daylight Savings).
- Each challenge runs for a week, and will close on the Thursday 5.00pm so that we can announce and showcase our weekly winners prior to the next challenge. 
- Each week’s winner will receive our special blinkie to display on their blog and a special little something.  Our last challenge for the month will be a sketch challenge, which will attract our main prize of a $15.00 gift voucher for that week’s winner.

How To Play Along:
- Copy and save our challenge banner and include it and a link back to the ABS blog in your post.
- Please link directly to your entry not just to your blog.
- Please don't link to postings made prior to the date of our current challenge.  All projects submitted must be new.
A maximum of 7 challenges may be combined including this one.       
- You may enter any challenge several times as long as each submission is with a new creation.
- We would love you to use AnnaBelle Stamps and embellishments, but you can play along without using them, it’s all about sharing ideas.


Thursday 18 August 2011

Daisy Lace Overlay - Heartfelt Creations


Hey Blogger's, hope you're having a good week.

I'm sharing one more card made with Heartfelt Creations stamps and dies. This one uses a daisy patch stamp and die to create an overlay, which is then popped up on foam tape over a glittery background.


6 x 6 inch side fold card

HC Products:  HCPC 3318 Daisy Patch Flowers PreCut Set
                        HCPC 3401 Bella Rose Scroll PreCut Set (sentiment)
                        HCD 703 Daisy Patch Die
                        Spellbinder Scalloped Heart Die
                        Spellbinder Labels 10 die
                        Spellbinders Fanciful Flight
                        Gala Glitz – white Art Glitter.
Other Products:
                        Ivory card Base, AnnaBelle Smooth White card, AC white glittered and pink card and DSP: KaiserCraft 6.5” paper pad – Miss Nelly.  Memento Tuxedo Black ink, Prisma pencils and OMS. MS Crystal coarse glitter, AnnaBelle pink gems, White organza ribbon. Zip dry glue and dries clear adhesive. Foam mounting tape.

Instructions:
Trim, score and fold Ivory card to make a 6” square side fold card.
1.     Layer the large patterned dsp to pink card.
2.     Trim the self-patterned dsp to 4.5” square. Centre the scalloped heart and cut.
3.     Stamp several of the two smallest daisies to white card. Colour with Prisma’s and OMS. Using the matching dies cut the daisies.
4.     Arrange the Daisies over the cut out section of the heart shape, overlapping the petals to create an overlay. Using Dries Clear adhesive glue the daisies into position. Add a second layer to a few and fill the centres of each with MS glitter and Gala Glitz.
5.     From the white glittered card trim a piece 4-5/8” square. Using foam mounting tape sit the filled heart over the glittered card.
6.     Position this to the large patterned piece and add the organza ribbon with the bow at the bottom corner.
7.     Stamp the sentiment to white card. Die cut using a Labels 10 die. Cut a second shape from pink card. Cut this in half and adhere to the back of the sentiment.
Using foam mounting tape and Zip Dry glue adhere the sentiment to the card front adding two pink gems.
8.     Die cut a butterfly from a scrap of the glittered paper and attach to card front with foam mounting tape.
9.     Using Zip Dry Glue adhere the completed card front to the Ivory card base.


Thanks for popping in today, I'm back with AnnaBelle Stamps challenge Friday tomorrow.......Hope to see you then.

Photobucket

Wednesday 17 August 2011

Heartfelt Creations - Decorative Basket

Hello,
Time to share a couple more projects using the Heartfelt Creations stamps and dies. You can see all this weeks DT cards on the Heartfelt Creations Blog or visit the girls direct .....links under the DT tab at the top of my page.

I'm sharing a couple of my projects here today with a third project tomorrow.
I do love this H C beautiful little basket die. When I first saw it I thought about a  needle case I had some years ago. It was a little more fan shaped but still .......couldn't get it out of my mind.  I set about making my little sewing caddy which I thought  perfect to slip in with a card for  my sewing friends.

 My second project is a fancy fold card called a swinging Z fold which was a fun card to make.


4.5” x 4” folder

HCPC 3410 – Decorative Basket PreCut Set
HCPC 3411 – Woven Basket PreCut Set
HCPC 3407 – Botanical Floral PreCut Set
HCD 714 Decorative Basket Die
Other Products:
A.C.C. rain: weave card, RomansPrint white card, and DSP KaiserCraft 6.5” paper pad Miss Nelly. SU: Baja Breeze ink, VersaFine: vintage sepia. Copic Markers. KaiserCraft gems. SU: lace border punch. Martha Stewart: pale blue seam binding. Six-inch length of 'rule' ribbon. Small scrap of white felt. Hole punch. Zip Dry glue. Stix2 1/8” ultra sticky tape.


Instructions:
1.     Trim a piece of A.C.C. to 9.5” x 6.5”.  Along the 9.5” side score at 4.5” and 5”. Turn and score along the 6.5” side at 4”, 4.25” and 4.5”. Fold concertina fashion along these score lines creating a 2” pocket. Punch the top edge with the Lace border punch.  
2.     Stamp the vine swirl in Baja Breeze to the inside pocket. Add a strip of strong tape to both ends of the pocket as well as the centre spine. Fold the pocket closed.
3.     Glue a strip of pale blue seam binding to the front cover about 1.5” from the top. Glue a second piece of ribbon 12” long to wrap around the back of the caddy.
4.     Layer a piece of dsp to the front cover over the ribbon.
5.     Die cut the fancy basket from more ‘rain’ card and adhere to the front of the cover.
6.     Die cut three sets of petals from dsp using HCPC 3407, shape and attach to the front of the basket over a twist of pale blue seam binding.
7.     Adhere the 6” ‘rule’ ribbon to a .5” wide strip of rain card.
8.     Using vintage sepia, stamp two decorative baskets to white card. Use the matching die to cut the baskets. Colour with Copic markers adding gems to the centre of the flowers.  Add a strip of strong tape to the top of the basket handles to adhere the two baskets together with the plain white card inside. Add a small piece of felt to the inside of the basket with Dries Clear Adhesive to complete the needle case.
9.     Stamp 4 Woven Baskets to white card and cut with the matching die. Trim off the handles and colour with Copic markers.  Using Zip dry glue 2 sets together, twice, to make two thread spools. Optional – hole punch top and bottom to make thread organisers.


5.75 Inch card.

HC Products:  HCPC 3410 Decorative Basket PreCut Set
                        HCPC 3412 Botanical Floral Basket PreCut Set (Sentiment)
                        HCPC 3407 Botanical Floral 2 PreCut Set
                        HCD 714 Decorative Basket Die
                        Spellbinders Rose Creations Die
                        Spellbinders Shapeabilitites Fleur De Lis Accents
                        Spellbinders Classic Small Ovals.
Other Products:
                        Ivory Card, GKD P.L. Ivory card, Green card, Pale pink card, Basic Grey dsp. Memento Tuxedo Black ink, MS hibiscus ink. Memento Bamboo Leaves ink. AnnaBelle Stamps, pink gems and pink D F satin ribbon. Stickpin. Zip Dry glue, Dries Clear adhesive.  Sewing machine and thread, Craft Knife. ScorPal.


Instructions:
The instructions for making this card can be found on SCS. (http://www.splitcoaststampers.com/resources/tutorials/swingzfoldcard/)

I stamped the three sets of two layer roses and one three-layer rose to pale pink card using Hibiscus ink. Using the matching dies to cut the flowers, shape and assemble them. Add a pink gem to the centre of each.
Die cut one fancy cut basket from pink dsp. Cut one plain white basket and layer these together.
Draw around the outside edge of the plain basket onto green card and cut by hand. This layer sits beneath the pink/white layers holding the arranged roses on the front of the basket. Stamp one swirly leaf in Bamboo Leaves to green card and using matching die cut out. Add this to the arrangement.
Machine stitch around the inside  of the card.
Stamp the sentiment, sponge with pink ink and add three gems. Attach this to the front left of card.
Die cut the decorative corner from Spellbinder Fleur De Lis to pale pink card. Add this to the card front along with two pink gems.
Layer the lace and ribbon to the right side of the card.  Tie a bow adding the stickpin, which holds the basket in a closed position.
Die cut an oval from white card; sponge whilst still in the die with pink ink. Add this to the inside of the card for a hand written message.


Hope you'll drop by tomorrow for another H C card, till then................

Photobucket