Wednesday, 28 September 2011

Heartfelt Creations Christmas Cheer


Hello, hello,

What a busy week it's been so far......the postman has been a regular visitor with some lovely new things to play with **wink**. That means I'm getting ready with new sets to share, from some of my favourite people.

It's Wednesday so if you've arrived here from the Heartfelt Creations Blog you'll know the designers have created more cards and projects to inspire you.  The girls would love you to go visit with them, you can find the links under the DT tab at the top of my page.

I have a couple of cards to share today with another tomorrow.


5 inch square card

HC Products:  HCPC 3420 Holiday Dove PreCut Set
                        HCPC 3415 Petite Poinsettia PreCut Set
                        HCPC 3428 Script Christmas tree PreCut Set (Sentiment)
                        HCD 715 Holiday Cheer Die

Other Products:
CASON white card.  AnnaBelle smooth white card. American Craft: ladybug weave card. DSP Kaisercraft 6.5 Paper Pad December 25th.
AnnaBelle Rich gold embossing powder. VersaMark. Prisma Pencils and OMS. Red satin ribbon, Kaisercraft pearls.
Paper Mill adhesive foam dots, Zip Dry glue and Dries Clear adhesive.

Instructions:
1.     Trim, score and fold CASON white card to make a 5-inch side fold card.
2.     Trim ladybug weave card to 4-7/8” square and layer with gold dsp.
3.     Stamp sentiment with VersaMark and emboss with rich gold e.p.
4.     Stamp2 x doves to smooth white card with VersaMark and emboss with rich gold e.p.  Cut with matching die and colour with Prisma’s and OMS.
5.     Wrap a length of ribbon to left side of card securing at the back. Tie a bow in another length and attach this to the top of the strip of ribbon.
6.     Using Zip Dry add one dove to front of card then add the second dove with foam dots overlapping the first.
7.     Stamp the smallest poinsettia twice to smooth white card using VersaMark and rich gold e.p.  Cut these out by hand, shape and layer adding a pearl to the centre.
8.     Adhere the double poinsettia to the bottom right of card.
9.     Adhere completed card front to base card.


 My second card is a fancy fold, quite small.....for those who like small cards.....I do every now and then!

Here's the inside.


\

3.75” square

HC Products:  HCPC 3421 Dove of Peace PreCut Set
                        HCD 715 Christmas Cheer Die
                        Spellbinders Shapeabilities Fleur De Lis Accents

Other Products:
                        American Crafts Ladybug Weave card. AnnaBelle smooth white card. KaiserCraft 25th December 6.5x 6.5 inch Paper pad. VersaMark. AnnaBelle rich gold e.p. Spellbinders Petite Oval dies. Cuttlebug Swiss dots embossing folder. Cuttlebug. Kaisercraft gold gems. Sullivans snowflake punches. Scraps of gold card. ScorPal.
Zip Dry glue and Dries Clear adhesive. Paper Mill adhesive foam dots.

Instructions:
1.     From ladybug weave trim shaped card, score and fold. Emboss with Swiss dots. Open out.
2.     Stamp dove to smooth white card using VersaMark and emboss with rich gold e.p. Using the matching die cut out.
3.     Trim dsp to 3.5” square and adhere to centre of open fancy shaped card.
4.     Adhere the embossed dove over the dsp.
5.     Punch two gold and two tiny white snowflakes. Adhere a tiny white snowflake over each gold one and add a gold gem to the centre. Add one snowflake to centre section.
6.     Die cut and emboss two Fleur De Lis circles, one from white card and one from Ladybug weave. Using an adhesive foam dot stack one over the other staggering slightly.
7.     Stamp the sentiment in VersaMark and emboss with rich gold e.p. Cut with an oval Spellbinder and adhere over the stacked circles.
8.     Trim three 1.5” strips from dsp and score along the length of each at .25” intervals. Fold on the score lines to create the pleated tape. (I joined each length as I worked across using Zip Dry to adhere together)
9.     Fold this around the closed card working the pleats at each side fold.
10. Trim a .5” strip of ladybug weave card. Wrap this around the card over the centre of the pleat. Adhere into position with Zip Dry.
11. Adhere the sentiment circle over the front edges of the pleated band with Dries Clear.
12. Add the second snowflake to the front sentiment circle to complete.

Click the links below to take you directly to the products in the store:


InLinkz.com

That's it for today, hope to see you tomorrow for my third card this week for Heartfelt Creations.

Photobucket


Sunday, 25 September 2011

The Roses Challenge

Hello crafting friends,

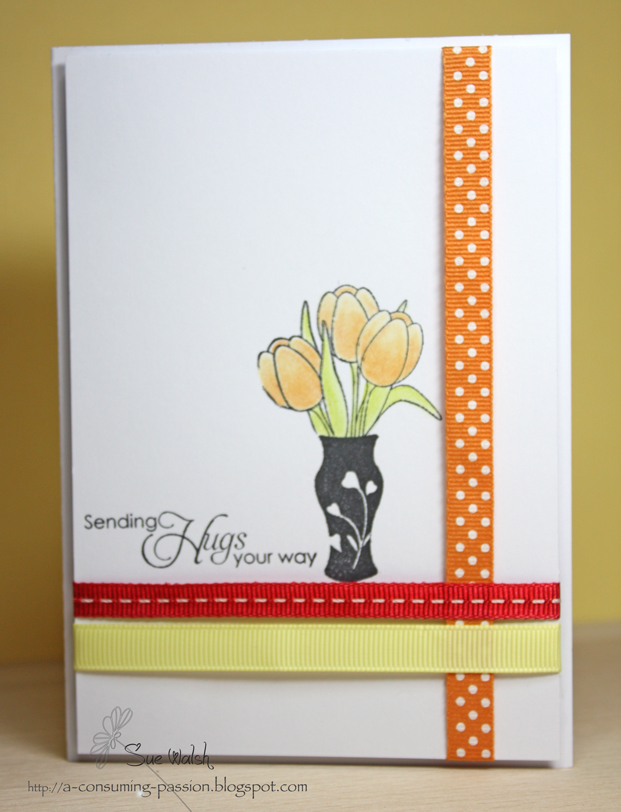
I'm so late today posting my card for the Roses Challenge!  You know we challenge each other each month and post our projects on the last Sunday of the month.  This month was Betty's Challenge, Betty loves ribbon and just wanted to see ribbon on our projects.

Here's my card using AnnaBelle Stamps and three different ribbons ......hope you like it!


The stamp set is Mother's Day Bouquet and the tulips are coloured with Prisma's and OMS.
I've popped up the front panel using adhesive foam dots.

I hope you'll take a moment to go check the girls cards, all the links are under the Roses tab at the top of my page.

Thanks for calling by this week I hope you're enjoying a restful week end.


Photobucket

Friday, 23 September 2011

AnnaBelle Stamps- Say It With A Male Card

DON'T FORGET TO ENTER THE ANNABELLE STAMPS BLOG HOP 
START AT THE ABS BLOG FOR YOUR CHANCE TO WIN 
STAMPED FOR CHRISTMAS.


This week's challenge at AnnaBelle Stamps is to Say It With a Male card. After looking through my box of cards I realised I have very few cards suitable for the men in my life.  Yes, I said men..... apart from my lovely husband I have 5 brothers and 5 nephews not to mention the brother-in-laws!  So I do need to make some don't I?

I chose a couple of AnnaBelle older sets for my card today, Tree-MEN-dous an obvious choice...with a Birthday sentiment from Sentimental Bluebells.


I've stamped a wood bark background (non ABS sorry!) to some white linen card before adding this lovely tree image and sentiment.
I've added a hand made card button by punching a .75" circle several times and adhering them one on top of the other. Punching two small holes through the centre to add some ABS natural cotton twine which I finished with a knot.  6mm Sultana Sprinkles add a little bling.

The pinstripe base card is a pre folded card from Imprint Fundamentals
Inks used on this card are SU chocolate chip and Kiwi kiss  with the wood bark stamped in VersaColor Vanilla. The image cut and backed with a Spellbinders Labels 1 die.

Check out the AnnaBelle Stamps blog for all our challenge details and cards or to visit each of the designers check the links under the DT Tab at the top of my page.

We hope to see you join in the fun again this week and look forward to some wonderful Male cards.

See you soon...............
Photobucket


About our challenges:
- We post our challenges every Friday at 12:00pm AEST (AEDT during Daylight Savings).
- Each challenge runs for a week, and will close on the Thursday 5.00pm so that we can announce and showcase our weekly winners prior to the next challenge. 
- Each week’s winner will receive our special blinkie to display on their blog and a special little something.  Our last challenge for the month will be a sketch challenge, which will attract our main prize of a $15.00 gift voucher for that week’s winner.

How To Play Along:
- Copy and save our challenge banner and include it and a link back to the ABS blog in your post.
- Please link directly to your entry not just to your blog.
- Please don't link to postings made prior to the date of our current challenge.  All projects submitted must be new.
- A maximum of 7 challenges may be combined including this one.       
- You may enter any challenge several times as long as each submission is with a new creation.
- We would love you to use AnnaBelle Stamps and embellishments, but you can play along without using them, it’s all about sharing ideas.

Thursday, 22 September 2011

Bows,Bells and Bling.......


Back again Blogger's with my third card for Heartfelt Creations this week. You can see all the designers projects over at the HC Blog or by visiting each designers blog. The links are under the DT tab at the top of my page.

This card was cut with Spellbinders Grand Callibur and the Grand Labels Four die.
Here are the details:

6 x 4.75 inch side fold card.

HC Products:  HCPC 3422 Poinsettia Cheer Bells PreCut Set
                        HCD 715 Christmas Cheer Die
                        Spellbinders Grand Nestabilities Grand Labels Four die
                        Spellbinder Small Circle dies
                        Spellbinders Grand Calibur
Other Products:
                        CASON ivory base card. AnnaBelle smooth white card. ACC red and green card. DCWV red glitter card. Nellie’s multi frame scalloped circle die. Cuttlebug Swiss dots embossing folder. Memento Tuxedo black ink. Copic markers. Sakura Stardust clear glitter pen. Kaisercraft gold gem. LSS red wired glitter ribbon. Zip Dry Glue. Dries Clear adhesive. Paper Mill adhesive foam dots.

Instructions:
1.     Using the largest Label 4 die and Ivory card die cut and emboss one complete shape. Score through the centre and fold to make the card base.
2.     From green card and the same die, cut and emboss one half of the same size shape. Carefully trim around the embossed outline.
3.     From red card and the 2nd largest label die cut one half shape. Emboss the red die cut with the Swiss dots embossing folder, before adhering to the green trimmed down shape.
4.     Wrap some of the red glittered ribbon around the straight edge of the layered shapes, securing at the back.  Tie a bow in another length of glittered ribbon and attach to the top of the card with an adhesive dot and Dries Clear.
5.     Stamp the ribboned poinsettia image and the small bell to smooth white card using tuxedo black ink. Cut the bell using the matching die. And colour with Copic markers adding highlights with the glitter pen.
6.     Colour the poinsettia with Copic markers, adding a gem to the centre and die cut using the small scalloped circle.
7.     Die cut a second scalloped circle from white card using the larger die.
8.     Cut one plain circle from the red glittered card then adhere this to the large scalloped circle with Zip Dry. Using foam dots add the coloured image over the glittered circle.
9.     Use foam dots to add the completed image to the card background adding the bell in the same way.
10. Adhere the completed card to the Ivory base card with Zip Dry glue.


That's it for this week but I have more ready for next Wednesday.....see you then for Heartfelt Creations.
Don't forget the AnnaBelle Blog Hop is still running so you've still got time to enter your name on any of the DT's blog posts from Tuesday. Friday is challenge Day for AnnaBelle Stamps so I'll be back with a project to share 12pm Aust EST.
Till then.................
Photobucket


Wednesday, 21 September 2011

Heartfelt Creations


Hi Blogger's

Good to see you again today.  More Heartfelt Creations cards to share this week. You can seethem all on the HC Blog as well as on each of the amazing designer's Blogs.  Links will be in the DT tab at the top of my page .
So, two more Christmas Cheer projects today with a third tomorrow.  The first card features the Script Christmas Tree:

6 inch square card.

HC Products:  HCPC3428 Script Christmas Tree PreCut Set

Other Products:        
                        CASON white base card. AnnaBelle smooth white card. Basic Grey eskimo kisses dsp. Print Blocks silver embossing powder, VersaMark. Cuttlebug spots and dots e f. EK Success diamond and lace border punch. White/silver webbed lace. The Twinery maraschino twine, Hug snug seam binding. Red button. Silver tree charm. Silver/white corner frame. Cuttlebug. Zip Dry ink. The Paper Mill foam adhesive dots.

Instructions:
Trim, score and fold CASON white card to make a 6-inch square side fold card.
1.     Stamp the script Christmas tree to smooth white card using VersaMark and emboss with silver e p. Trim to 3.5” x 4” and layer over red dsp, adding the silver/white corner frame.
2.     Trim smooth white card to 5-7/8” square and add a layer of dsp cut 1/8” smaller.
3.     From more dsp punch the diamond and lace border then punch a second layer from plain white card. Layer the dsp over the white adhere with Zip Dry glue and trim to size.
4.     Wrap the white/silver webbed lace around the diamond and lace strip securing at the back. Across the centre of this wrap the white seam binding threading the ends through a red button finish with a bow. Thread the maraschino twine through the button adding the charm and finish with a bow. Add this strip to the card front.
5.     Emboss a piece of white card 3” x 4” using the spots and dots e f and adhere to card front.
6.     Using foam adhesive dots add the silver embossed script Christmas tree over the embossed white card.
7.     Adhere the completed card front to the base card using Zip Dry glue.
~~~~~~~~~~~~~~~~~~~~~~~~~~


My second card features two sets, the pretty  Snowy Winter Background, with Holiday Poinsettia candle. Stacking the poinsettias makes for a charming card which I called 'Mum's Choice' ...... because mine loves candles on Christmas cards!


6-inch square side fold card.

HC Products:  HCPC 3426 Snowy Winter Background PreCut Set
                        HCPC 3419 Holiday Poinsettia Candle PreCut Set
                        HCPC 3415 Petite Poinsettia PreCut Set
Other Products:
CASON ivory base card. LSS red card. GKD Kraft. Versa Magic Archival cloud white chalk ink. Brilliance moonlight white ink. Memento tuxedo black ink. LSS White card. Copic Markers. Signo white pen. Scraps of Cristina Re specialty paper (for punched snowflakes). Sullivan snowflake punches. AnnaBelle gem. Double faced satin ribbon.  Dries Clear adhesive, Zip Dry glue and Paper Mill adhesive foam dots.

Instructions:
1.     Trim, score and fold ivory card to make a 6-inch side fold card.
2.     Trim red card to 1/8” smaller than base card and ink edges with Brilliance moonlight ink. Wrap white ribbon around left side of card, securing at the back.
3.      Stamp background image to Kraft card in Versa Magic cloud white. Trim to 5.25” x 5.5 inches and ink the edges. Using a white gel pen highlight dots and add corner and edge dots. Adhere to right side of red card.
4.     Punch 5 snowflakes from the specialty paper using the Sullivan punches and add to the background image using Dries Clear adhesive.
5.     Stamp the candle from HCPC 3419 and the small poinsettia from HCPC 3415 to white card using tuxedo black ink. Colour with Copic markers and cut by hand. Shape and add the small poinsettia to the main image using Dries Clear adding the gem to the centre.
6.     Pop the candle up over the background stamp with foam dots.
7.     Fold a double loop bow from the satin ribbon and add this over the ribbon strip on a foam dot.
8.     Add the completed card front to the base card with Zip Dry glue.


Thanks so much for your visit today, I'll share a Grand Calibur shaped card tomorrow....interested?

Photobucket


Tuesday, 20 September 2011

AnnaBelle Stamps Blog Hop


AnnaBelle Stamps Blog Hop
Come and join us the 1st and 3rd Tuesday of every month as we have fun sharing a new set with you!  

How to Play :
To keep our hop as fun and simple as possible, click through each of the DT blogs to see what they've created using this set.
It's not a requirement to comment on all of our blogs, (though we love it if you do :)) just remember to add your name to the Inlinkz link on any of the blogs for your chance to win this fabulous set! The hop will run for one week!

Along with each of our blog hops we will announce our special deal that will run for the same week.
- The special deal  for our Blog Hop is to receive 20% off Stamped For Christmas for the next two weeks. 
- The prize for this weeks blog hop will be the featured set Stamped for Christmas.

Hello Bloggers,

Good to see you here for AnnaBelle Stamps  Blog Hop.

Our Blog Hop starts and ends at the AnnaBelle Stamps Blog. If you came here from Andrea's blog you're on the right track, when you leave me you'll be heading over to Kylie's  fabulous Blog. 


I have two Christmas cards to share today, so two more to cross off the list! With lots of images and some great sentiments I'll be making lots of cards from this one set.


Ivory, red and gold for this card with one of the small accent star images stamped in VersaMark and the elegant script gold embossed. A chipboard star with a button and some red/white hemp twine to finish.


This card uses the tree, (stamped in SU pear pizzazz) as well as the infill panels popped up on foam. Some star embellishments add a little sparkle to the tree with some paper pieced parcels beneath. Three strips of Washi tape sit over the Swiss dots embossed card background.
So onward to Kylie's blog for more inspiration.......
Thanks for joining us again today, enjoy the rest of the hop and don't forget to add your name to the Linkie at the end of this post.


Photobucket

Friday, 16 September 2011

CASual Friday.


Hello....wish you were here the weather is glorious!!!!!

Today the girls from AnnaBelle Stamps are playing along with CASual Friday Challenge # 20, the sponser is .....guess who?This weeks challenge is to make mini cards 4 x 4 inches, what fun.

I've used AnnaBelle Stamps Squared Mother's Day for the image and sentiment and All Squared  for the frame..... here's my card, which is exactly 4 x 4 inches square.  


SU chocolate chip and peach parfait for the inks.  RomanPrint ribbed card for the base card with some beautiful natural cream card used to stamp the image and frame.

Photobucket